After you:
- configure the Sertifi for Salesforce app, AND
- configure Salesforce CPQ
You can install and configure the Sertifi for Salesforce CPQ extension package to send quotes for signature.
This article contains the following sections:
- Downloading and installing the Sertifi for CPQ extension package
- Configuring Sertifi for CPQ
- Optional - Configuring the Data Mapping Lightning component
- Next Steps
Downloading and installing the Sertifi for CPQ extension package
To download and begin setup of the Sertifi for CPQ extension package:
- Contact your Customer Success Manager for the installation link for the Sertifi for Salesforce CPQ extension package.
- Click the link once it’s provided to you or enter the URL in your web browser.
- Select Install for Admins Only, Install for All Users, or Install for Specific Profiles.
- Click Install.
- Click Continue. Sertifi for CPQ begins downloading, and then appears in your Installed Packages section. If your installation takes a long time, you’ll receive an email when installation is complete.
Configuring Sertifi for CPQ
To properly configure Sertifi for CPQ:
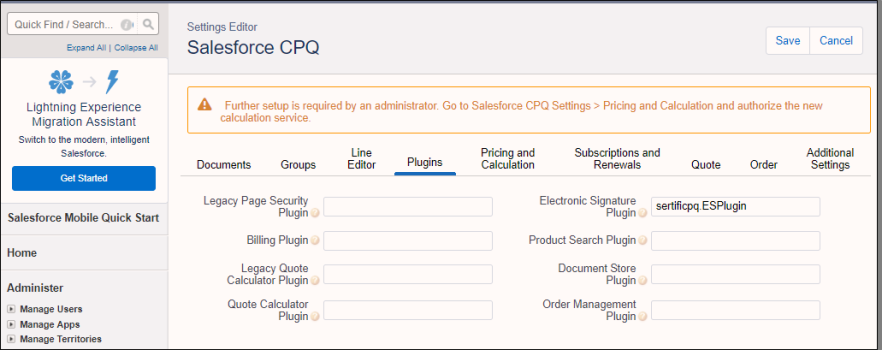
- Navigate to the Installed Packages page, either by clicking Done after installation, or by entering and then selecting Installed Packages in the Quick Find search bar.
- Click Configure next to Salesforce CPQ.
- Click Plugins.
- Enter sertificpq.ESPlugin in the Electronic Signature Plugin field.
- Click Save.
You’ve now properly configured Sertifi for CPQ.
Optional - Configuring the Data Mapping Lightning component
If you're using Salesforce Lightning, it's a recommended best practice to use the Data Mapping Lightning component to prepopulate fields in your Sertifi Sending Wizard.
After you install and configure the Sertifi for Salesforce app and the Sertifi for Salesforce CPQ extension, and you're using Salesforce Lightning, you should set up your Sertifi Sending Wizard via the Data Mapping component. This Lightning component pulls fields directly from the Quote object to prepopulate fields in the Sertifi Sending Wizard. This saves your sales reps time in sending Quotes in Sertifi for Salesforce CPQ, can assist in preventing errors, and keeps your data organized.
To use the Data Mapping lightning component:
- Navigate to the Lightning App Launcher.
- Select Sertifi for Salesforce CPQ.
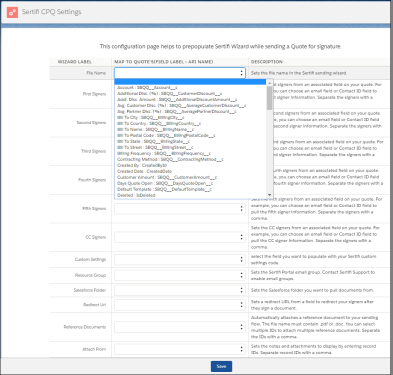
- Click the Sertifi CPQ Settings tab. The Data Mapping Lightning component opens.
- Configure your prepopulated data by selecting the relevant fields from each dropdown.
- Click Save.
Next Steps
Run a sanity check to ensure that all the phases of setup and configuration are complete:
- Installed and configured the Sertifi for Salesforce application.
- Installed and set up the Sertifi for Salesforce CPQ extension package.
- Enabled all custom settings required for the app to work.


